
Dynamics 365 FO - X++ Control Statement - Practice
Nghia Song - Microsoft Dynamics 365 Technical Consultant
Nghia Song
Tel - WhatsApp: +84967324794
Email: songnghia.uit@gmail.com
11.1 Create a Times Table Using a While Loop
1. Open Visual Studio.
2. Create a new item Code > Runnable Class(Job).
3. Rename the job.
4. Add the following code.

5. Compile the code (press F7or click the Compile button in the toolbar).
6. Run the job (press F5or click the Go button in the toolbar).
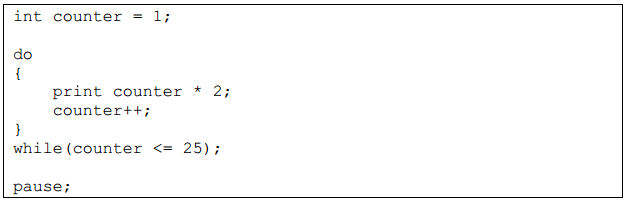
11.2 Create a Times Table Using Do…while Loop
1. Open Visual Studio.
2. Create new item Code > Runnable Class(Job).
3. Rename the job.
4. Add the following code
5. Compile the code (press F7or click the Compile button in the toolbar).
6. Run the job (press F5or click the Go button in the toolbar).
11.3 Create a Times Table Using a for Statement
1. Open Visual Studio.
2. Create new item Code > Runable Class(Job).
3. Rename the job.
4. Add the following code.

5. Compile the code (press F7or click the Compile button in the toolbar).
6. Run the job (press F5or click the Go button in the toolbar).
11.4 Create a Yes No Box
Isaac has been asked to create a job that will prompt the user to continue or cancel. The user should be asked whether he or she wants to continue and be able to choose Yes or No.
Create a new job in the AOT that contains a box where the user can decide to continue or cancel.
1. The caption on the window is "Question."
2. The text should be "Do you want to continue?"
3. The default button is "Yes."
- Step by Step
4. Open Visual Studio.
5. Create new item Code > Runnable Class(Job).
6. Rename the job.
7. Add the following code.

8. Compile the code (press F7or click the Compile button in the toolbar).
9. Run the job (press F5or click the Go button in the toolbar).
11.5 Create an Infolog Tree
Isaac has been asked to create an Infolog Tree that has an Info message, a Warning message, and an Error message.
Create a tree of Infolog messages using a job in Microsoft Dynamics AX. The tree should have a root node that states: "This is the Infolog Tree lab." The tree should contain at least one of each type of message (Info, Warning and Error).
Step by Step
1. Open Visual Studio.
2. Create a new item Code > Runnable Class(Job).
3. Rename the job.
4. Add the following code.

5. Compile the code (press F7or click the Compile button in the toolbar).
6. Run the job (press F5or click the Go button in the toolbar).
11.6 Create a Dialog Box
Isaac has been asked to create a dialog box that will prompt the user to enter a customer account number and a sales order ID.
Create a dialog box that lets the user select a customer account number and a sales order ID. Once the user clicks OK, show the values of each selection using the Infolog.
Step by Step
1. Open Visual Studio.
2. Create new item Code > Runnable Class(Job).
3. Rename the job.
4. Add the following code.
Dialog dialog;
DialogGroup dialogGroup;
DialogField dialogFieldCustAccount;
DialogField dialogFieldSalesId;
dialog = new Dialog("Simple Dialog");
dialogGroup = dialog.addGroup("Customer");
dialogFieldCustAccount = dialog.addField(extendedTypeStr(CustAccount));
dialogFieldSalesId = dialog.addField(extendedTypeStr(SalesId));
if (dialog.run())
{
info(dialogFieldCustAccount.value());
info(dialogFieldSalesId.value());
}
5. Compile the code (press F7or click the Compile button in the Toolbar).
6. Run the job (press F5or click the Go button in the toolbar).
11.7 Use X++ Control Statements
Isaac has been asked to create a job that will ask the user if he or she wants to display his or her date of birth. If the user chooses Yes, the system should print the user's name and date of birth. If the user chooses No, the system should only print the user's name.
Create a dialog for the user that determines, based on input, what appears on a screen.
1. Create a new job in the AOT and declare and initialize a DialogButton object variable and a container data type variable.
2. The three elements of the container are your first name, last name, and birth date.
3. The Dialog button should be a Yes No box with the text "Do you want to display your birth date?" with Yes being the default button.
4. If Yes is clicked -first name, last name, and birth date appear.
5. If No is clicked -only first and last name appear.
Step by Step
1. Open Visual Studio.
2. Create a new item Code > Runnable Class(Job).
3. Rename the job.
4. Add the following code.
DialogButton dialogButton;
container nameAndDOB;
nameAndDOB = ["John","Doe",mkDate(28,9,71)];
dialogButton = Box::yesNo("Do you want to see the birthdate?", DialogButton::Yes);
if (dialogButton == DialogButton::Yes)
{
Box::info(strFmt("%1 %2, %3", conPeek(nameAndDOB,1),
conPeek(nameAndDOB,2), date2str(conPeek(nameAndDOB,3),-1,-1,-1,-1,-1,-1)));
}
else
{
Box::info(strFmt("%1 %2",conPeek(nameAndDOB,1),
conPeek(nameAndDOB,2)));
}
5. Compile the code (press F7or click the Compile button in the toolbar).
6. Run the job (press F5or click the Go button in the toolbar).
- Note the use of mkDate and strfmt functions. MkDate ("make date") returns a date from the parameters day, month and year. Strfmt ("string format") inserts any type of value into a string. Next: Dynamics 365 FO - Accessing the database
https://www.songnghia.com/2022/09/dynamics-365-fo-accessing-database.html

 WhatsApp


0 Comments