
Dynamics 365 FO - Objects and Classes - Practice
Nghia Song - Microsoft Dynamics 365 Technical Consultant
Nghia Song
Tel - WhatsApp: +84967324794
Email: songnghia.uit@gmail.com
Declaration of Classes
Creating a Class in the Application Object Tree
You create an application class by following these steps:
In the AOT, locate the Classes node.
Right-click the Classes node and click New Class in the shortcut menu.
Expand the Class1 node, so you can see the classDeclaration node.
Right-click the classDeclaration node, and then click View Code. This displays the code Editor window.
In the classDeclaration code block, before the open brace {, the class declaration is decorated with the public modifier. All classes in Microsoft Dynamics 365 are public. If you remove the public modifier, the system still treats the class as public.
Other modifiers can be specified on the class declaration, including final and extends.
Creating variables in a class
All classes are public, but all member variables are implicitly protected. Even though all member variables are protected, you cannot decorate a member variable with private or public keywords. All member variables belong only to object instances of the class. You cannot decorate a member variable with the static keyword. The following steps exemplify these rules:
Right-click the classDeclaration node, and then click View Code.
In the code Editor window for the classDeclaration, add the following declaration of a string variable on a line between the open and close braces {}:
str firstName;
The X++ code for the classDeclaration now looks like the following.

You can provide access to a member variable by returning it from a simple instance public methods that get and set its value.
Creating Accessor Methods in a Class
In this section, you add simple public methods that get and set the value of the member variable firstName.
Add a Getter Accessor Method
Follow these steps to add a method that gets or returns the value of a member variable:
Right-click the Class1 node, and then click New > Method.
Rename the method1 node to getFirstName.
In the code Editor window, paste in the following X++ code for the method.

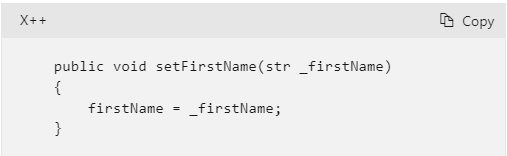
Add a Setter Accessor Method
Follow these steps to add a method that sets the value of a member variable:
Right-click the Class1 node, and then click New > Method.
Rename the method1 node to setFirstName.
In the code Editor window, paste in the following X++ code for the method.
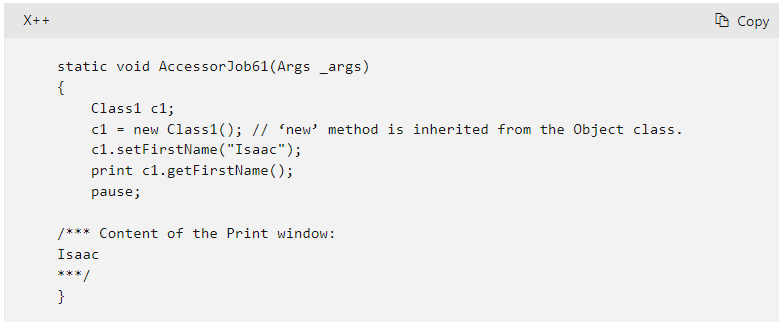
Test the Accessor Method
The following X++ job tests the preceding getter and setter accessor methods.
Constructors
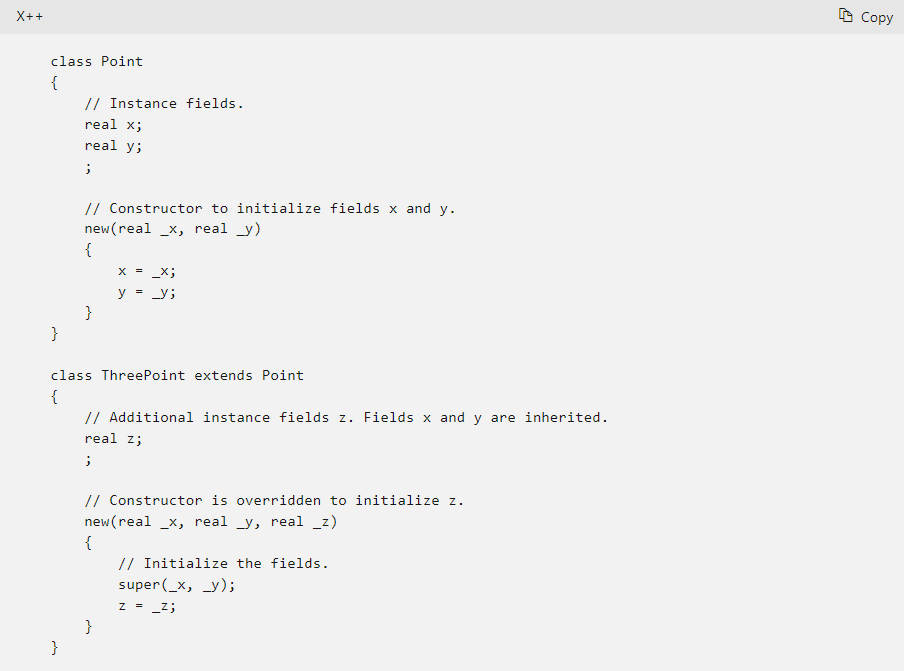
Creating Other Objects from a Constructor
A class constructor can instantiate other objects, in addition to creating an instance of the class. The following code illustrates one such situation by declaring a Rectangle class that uses two Point objects to define its bounds.

Accesing Members in a Object
X++ does not allow you to access the variables of an object by referring to the names of the variables, qualified with the name of the object:
myPoint.x = 10.0; //Not possible
myPoint.y = 25.7; //Not possible
The only way to access the member variables in a class is through accessor methods.
Destructors
Finalize
Use the finalize method to explicitly destruct an object. There are no implicit calls to the finalize method. You must call it to execute the statements in it.
// From any method in a class.
{
...
if(Condition)
// Removes object from memory.
this.finalize();
...
}
The finalize method is also where to put any other clean-up code. For example, if your class uses a DLL module, you can use the finalize method to release the DLL when you no longer need it.
Set an Object Handle to null
Set the object handle to null to terminate an object. This only destroys the object if there are no other object handles pointing to it. Check that other programmers haven't already used the object handle.
For example:
// Create an object handle of the type MyObject.
MyObject mo;
;
// Create an object of MyObject type and
// link it to the object handle.
mo = new myObject();
// Terminate the object.
mo = null;
Creating a Subclass
Subclasses are classes that extend (inherit from) other classes. In X++, a new class can only extend one other class; multiple inheritance is not supported. If you extend a class, it inherits all the methods and variables in the parent class (the superclass).
Subclasses enable you to reuse existing code for a more specific purpose, saving time on design, development, and testing. To customize the behavior of the superclass, override the methods in your subclass.
For terminology, a superclass is often called a base class, and a subclass is often called a derived class.
Preventing Class Extension
You can prevent classes from being extended by using the final modifier:
public final class Attribute
{
int objectField;
}

 WhatsApp


0 Comments